SpringSecurity
web应用框架需要进行认证和授权,认证是验证当前访问系统的是不是本系统的用户,并且确定是哪个用户,授权:经过认证后判断当前用户是否有权限进行某个操作
引入SpringSecurity
项目pom.xml文件中直接引入
<dependency>
    <groupId>org.springframework.boot</groupId>
    <artifactId>spring-boot-starter-security</artifactId>
</dependency>
引入依赖后尝试访问之前的接口就会自动跳转到一个SpringSecurity的默认登录页面,默认用户名是user,密码会输出在控制台
认证
登录校验过程
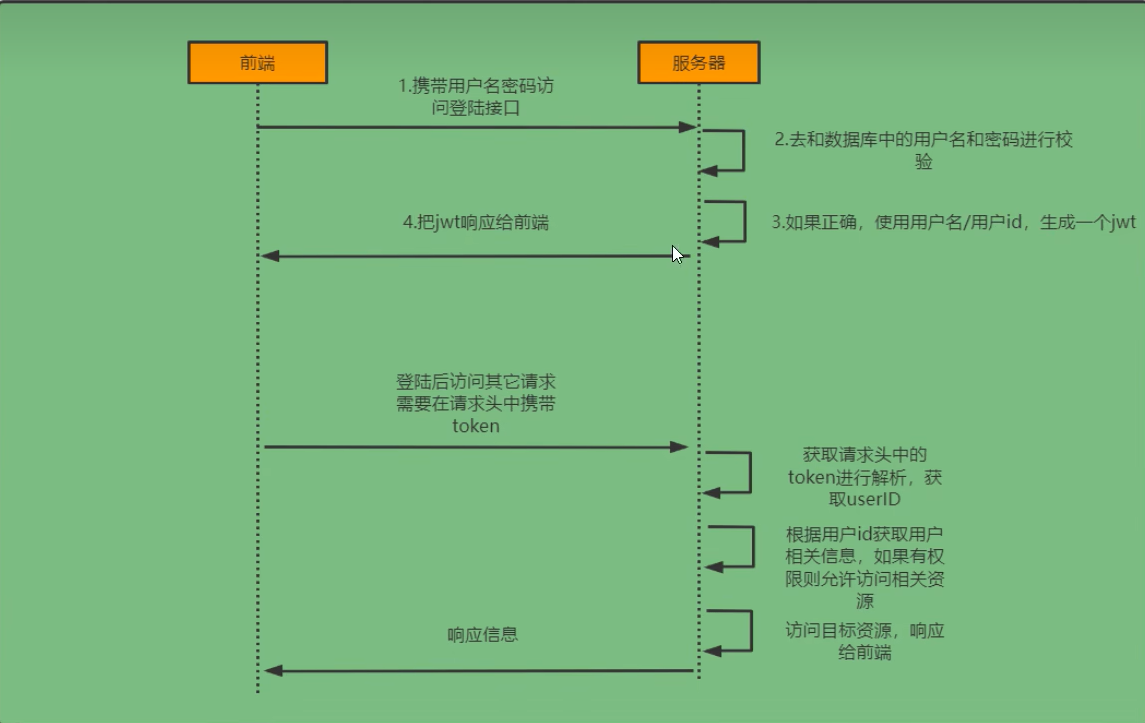
jwt全称Json-web-token,通过json的方式作为web应用中的令牌,用于在各方之间安全地将信息作为json对象传输
完整流程
springsecurity的原理其实就是一个过滤器链,内部包含了提供各种功能的过滤器。一些重要的过滤器
UsernamePasswordAuthenticationFilter:负责处理在登录页面填写完用户名和密码的登录请求
ExceptionTranslationFilter:处理过滤器链中抛出的任何AccessDeniedException(用户在访问受保护资源时被拒绝而抛出的异常)和AuthenticationException(身份验证失败时抛出的安全认证异常)
FilterSecurityInterceptor:负责权限校验的过滤器
认证流程
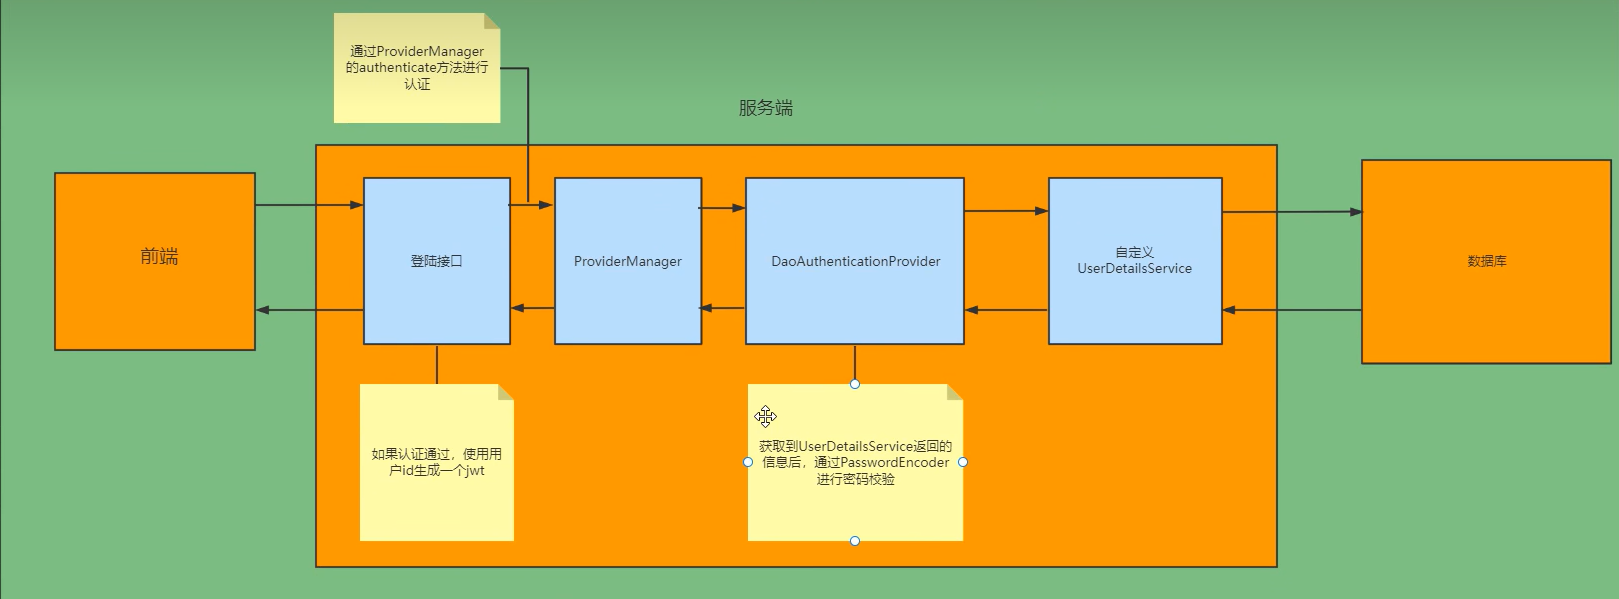
通过自定义UserDetailsService接口去查询数据库中对应的用户和权限信息,然后将去权限信息封装成UserDetails对象;自定义登录接口,调用ProviderManager的方法进行认证,认证通过生成jwt,将用户信息存入redis
前端携带token发起请求,怎样进行校验?
需要自己定义一个过滤器,jwt认证过滤器
1、获取token
2、解析token
3、获取userid
4、封装Authentication对象存入SecurityContextHolder,从中获取当前请求的用户信息
这样就会出现频繁地查询用户信息,所以在登录接口认证通过,使用用户id生成一个jwt,然后用userid作为key,用户信息作为value存入redis,就减少了了数据库频繁查询的压力
实现过程
数据库校验用户
1、添加依赖
<!--redis依赖-->
<dependency>
    <groupId>org.springframework.boot</groupId>
    <artifactId>spring-boot-starter-data-redis</artifactId>
</dependency>
<!--fastjson依赖-->
<dependency>
    <groupId>com.alibaba</groupId>
    <artifactId>fastjson</artifactId>
    <version>1.2.33</version>
</dependency>
<!--jwt依赖-->
<dependency>
    <groupId>io.jsonwebtoken</groupId>
    <artifactId>jjwt</artifactId>
    <version>0.9.0</version>
</dependency>
2、redis使用FastJson序列化
3、redis的一些配置
4、统一响应类
5、生成jwt的工具类
6、redis的工具类
7、字符串渲染到客户端的工具类
8、用户表的实体类
9、在数据库中创建用户表
10、添加mybatisplus和mysql的依赖
<dependency>
    <groupId>com.baomidou</groupId>
    <artifactId>mybatis-plus-boot-starter</artifactId>
    <version>3.4.3</version>
</dependency>
<dependency>
    <groupId>mysql</groupId>
    <artifactId>mysql-connector-java</artifactId>
</dependency>
配置数据库信息
spring:
    datasource:
        url:jdbc:mysql://1ocalhost:3306/sg_security?characterEncoding=utf-8&serverTimezone=uTc
        username: root
        password: root
        driver-class-name: com.mysq1.cj .jdbc.Driver
定义mapper接口
public interface UserMapper extends BaseMapper<User>{

}
修改user实体类
在类名上加上@TabName(value="sys_user"),id字段加上@TableId
配置mapper扫描
@SpringBootApplication
@MapperScann("com.bai.mapper")
public class SimpleSecurityApplication{
    public static void main(String[] args){
        ConfigurableApplicationContext run = SpringApplication.run(SimpleSecurityApplication.class);
    }
}
实现UserDetailsService接口查询用户和对应的权限信息
@Service
public class UserDetailsServiceImpl implements UserDetailsService{

    @Autowired
    private UserMapper userMapper;

    @Override
    public UserDetails loadUserByUsername(String username) throws UsernameNotFoundException{

        //查询用户信息
        LambdaQueryWapper<User> queryWrapper = new LambdaQueryWapper<>();
        queryWrapper.eq(User::getUserName,username);
        User user = userMapper.selectOne(queryWapper);
        //如果没有查到用户抛出异常
        if(Objects.isNUll(user)){
            throw new RuntimeException("用户名或者密码错误");
        }

        return new LoginUser(user);
    }
}
返回的如果是UserDetails,他是一个接口,需要实现他的方法,对他的方法进行重写
@Data
@NoArgsContructor
@AllArgsContructor
public class LoginUser implements UserDetails{

    private User user;
}
密码加密存储
测试的时候为什么需要在数据库密码前面加{noop}
默认使用的PasswordEncoder要求数据库中的密码格式为 :{id}password,它会根据id去判断密码的加密格式。一般不会采用这种方式,需要替换PasswordEncoder
一般使用SpringSecurity提供的BCryptPasswordEncoder
@Configuration
public class SecurityConfig extends WebSecurityConfigurerAdapter{

    @Bean
    public PasswordEncoder passwordEncoder{
        return new BCryptPasswordEncoder();
    }
}
登录接口
引入jwt的依赖
<dependency>
    <groupId>com.baomidu</groupId>
    <artifactId>mybatis-plus-boot-starter</artifactId>
    <version>3.4.3</version>
</dependency>
需要自定义登录接口然后让SpringSecurity对这个接口放行,让用户访问这个接口的时候不用登录也能发访问。
在接口中通过AuthenticationManager的authenticate方法来进行用户认证 ,需要在springSecurity配置中将AuthenticationManager注入容器。
认证成功后生成一个jwt返回,并且为了让用户下回请求时能通过jwt识别出具体的用户,需要吧用户存入redis,把用户的id作为key
controller
@RestController
public class LoginController{

    @Autowired
    private LoginService loginSerice;

    @PostMapping("/user/login")
    public ResponseResult login(@RequestBody User user){
        // 登录
        return loginService.login(user);
    }
}
impl
@Service
public class LoginServiceImpl implements LoginService{

    @Autowired
    private AuthenticationManager authenticationManager;

    @Autowired
    private RedisCache redisCache;

    @Override
    public ResponseResult login(User user){
        // AuthenticationManager authenticate进行用户认证
           // 1.在SecurityConfig配置类重写authenticationManagerBean()
        UsernamePasswordAuthenticationToken authenticationToken = new UsernamePasswordAuthenticationToken(user.getUserName(),user.gePassword());
        Authentication authenticate = authenticationManager.authenticate(authenticationToken);
        // 如果认证没通过,给出对应的提示
        if(Objects.isNull(authenticate)){
            throw new RuntimeException("登录失败");
        }
        // 如果认证通过,使用userId生成jwt
        LoginUser loginUser = (LoginUser)authenticate.getPrincipal();
        String userId = loginUser.getUser().getId().toString();
        String jwt = JwtUtil.createJWT(userId);
        Map<String,String> map = new HashMap<>();
        map.put("token",jwt);
        // 把完整的用户信息存入redis,userId为key
        redisCache.setCaheObject("login:"+userId,loginUser);
        return new ResponseResult(200,"登录成功",map);
    }
}
service
public interface LoginService{
    ResponseResult login(User user);
}
SecurityConfig
@Configuration
public class SecurityConfig extends WebSecurityConfigurerAdapter{

    @Autowired
    private JwtAuthenticationTokenFilter jwtAuthenticationTokenFilter;

    @Bean
    public PasswordEncoder passwordEncoder{
        return new BCryptPasswordEncoder();
    }

    @Override
    public AuthenticationManager    authticationManagerBean() throws Exception{
        return super.authenticationManagerBean();
    }

    @Override
    protected void configure(HttpSecurity http) throws exception{
        http
            //关闭csrf
            .csrf().disable
            .sessionManagement().sessionCreationPoliy(SessionCreationPolict.STATELESS)
            .and()
            .authorizeRequests()
            //对于登录接口允许匿名访问
            .antMatchers("/user/login")
            //除上面外的所有请求全部需要鉴权认证
            .anyRequest().authticated();

       //添加过滤器
   http.addFilterBefore(jwtAuthenticationTokenFilter,UsernamePasswordAuthenticationFilter.class);
    }
}
认证过滤器
@Component
public class JwtAuthenticationTokenFilter extends OncePerRequest{

    @Autowired
    private RedisCache redisCache;

    @Override
    protected void doFillterInternal(HttpServletRequest request,HttpServletResponse response,FilterChain filterChain) throws {
        //获取token
        String token = request.getHeader("token");
        if(!StringUtils.hasText(token)){
            // 放行
            filterChain.doFilter(request,response);
            return;
        }
        //解析token
        try{
            Claims claims = Jwt.parseJWT(token);
            userId = claims.getSubject();
        }catch(Exception e){
            e.printStackTrace();
            throw new RuntimeException("token非法");
        }
        //从redis中获取用户信息
        String redisKey = "login"+userId;
        LoginUser loginUser = redisCache.getCacheObject(redisKey);
        if(Objects.isNUll(loginUser)){
            throw new RuntimeException("用户未登录");
        }
        //存入SecurityContextHolder

        UsernamePasswordAuthenticationToken authenticationToken = new UsernamePasswordAuthenticationToken(loginUser,null,null);
        SecurityContextHolder.getContext().setAuthentication();
        // 放行
        filterChain.doFilter(request,response);
    }
}
为什么不使用Filter实现接口
Filter会被多次调用执行过滤操作,换成spring提供的实现类,每个请求只会执行一次
退出登录
自定义接口获取SecurityContextHolder中的认证信息,删除redis中对应的数据即可
@RestController
public class LoginController{

    @Autowired
    private LoginService loginSerice;

    @PostMapping("/user/login")
    public ResponseResult login(@RequestBody User user){
        // 登录
        return loginService.login(user);
    }

    @RequestMapping("/user/logout")
    public ResponseResult logout(){
        return logService.logout();
    }
}
impl
@Override
public ResponseResult logout(){
    //获取SecurityContextHolder中的用户id
    UsernamePasswordAuthenticationToken authentication = (UsernamePasswordAuthenticationToken)SecurityContextHolder.getContext().getAuthentication();
    LoginUser loginUser = (LoginUser)authentication.getPrincipal();
    Long userId = loginUser.getUser().getId();
    //删除redis中的值
    redisCache.deleteObject("login:"+userId);
    return new ResponseResult(200,"注销成功");
}
授权
授权基本流程
在SpringSecurity中,会使用默认的FilterSecurityInterceptor来进行权限校验。在FilterSecurityInceptor中会从SecurityContextHolder获取其中的authentication,然后获取其中的权限信息,校验当前用户是否拥有访问的当前资源所需的权限,所以在项目中需要把当前用户的权限信息存入Authentication
授权实现
1、限制访问资源所需的权限
SpringSecurity提供了基于注解的权限控制方案,使用注解去指定访问对应的资源所需的权限,首先开启相关配置
@EnableGlobalMethodSecurity(prePostEnabled=true)
然后就可以使用@PreAuthorize
@RestController
public class HelloController{
    @RequestMapping("/hello")
    @PreAuthorize("hasAuthority('test')")
    public String hello(){
        return "hello";
    }
}
实现UserDetailsService接口查询用户和对应的权限信息中需要封装权限信息
@Service
public class UserDetailsServiceImpl implements UserDetailsService{

    @Autowired
    private UserMapper userMapper;

    @Override
    public UserDetails loadUserByUsername(String username) throws UsernameNotFoundException{

        //查询用户信息
        LambdaQueryWapper<User> queryWrapper = new LambdaQueryWapper<>();
        queryWrapper.eq(User::getUserName,username);
        User user = userMapper.selectOne(queryWapper);
        //如果没有查到用户抛出异常
        if(Objects.isNUll(user)){
            throw new RuntimeException("用户名或者密码错误");
        }

        List<String> list = new ArrayList<>(Arrays.asList("test","admin"));

        return new LoginUser(user,list);
    }
}
返回LoginUser参数限制,添加成员变量和有参构造,实现获取权限的方法
private List<String> permission;

@JSONField(serialize = false)
private List<SimpleGrantedAuthority> authorities;

public LogisUser(User user,List<String> permission){
    this.user = user;
    this.permission = permission;
}

@Override
public Collection<? extends GranteAuthority> getAuthorites(){
    //把permission中String类型的权限信息封装成SimpleGrantedAuthority对象
    List<GrantedAuthority> newList = new ArrayList<>();
    for(String permission:permissions){
        SimpleGrantedAuthority authority = new SimpleGrantedAuthority();
        newList.add(authority);
    }
    if(authorities!=null){
        return authorities;
    }
    //1.先把permissions转换成流对象2.引用构造器3.然后收集成集合
    authorities = permissions.steam().map(SimpleGrantedAuthority::new).collect(Collections.toList());
    return authorities;
}
需要存入redis,SimpleGrantedAuthority会进行序列化,在方法头添加注释进行忽略,authorities这个成员变量就不会进行序列化
授权使用
@Component
public class JwtAuthenticationTokenFilter extends OncePerRequest{

    @Autowired
    private RedisCache redisCache;

    @Override
    protected void doFillterInternal(HttpServletRequest request,HttpServletResponse response,FilterChain filterChain) throws {
        //获取token
        String token = request.getHeader("token");
        if(!StringUtils.hasText(token)){
            // 放行
            filterChain.doFilter(request,response);
            return;
        }
        //解析token
        try{
            Claims claims = Jwt.parseJWT(token);
            userId = claims.getSubject();
        }catch(Exception e){
            e.printStackTrace();
            throw new RuntimeException("token非法");
        }
        //从redis中获取用户信息
        String redisKey = "login"+userId;
        LoginUser loginUser = redisCache.getCacheObject(redisKey);
        if(Objects.isNUll(loginUser)){
            throw new RuntimeException("用户未登录");
        }
        //存入SecurityContextHolder

        UsernamePasswordAuthenticationToken authenticationToken = new UsernamePasswordAuthenticationToken(loginUser,null,loginUser.getAuthorities());
        SecurityContextHolder.getContext().setAuthentication();
        // 放行
        filterChain.doFilter(request,response);
    }
}
从数据库查询权限信息
RBAC权限模型:全称为Role-Based Access Control,基于角色的权限控制
定义mapper根据userid查询权限信息
public interface MenuMapper extends BaseMapper<Menu>{
    List<String> selectPermsByUserId(Long id);
}
在配置文件中说明mapper的映射的xml文件位置
mybatis-plus:
    mapper-locations:classpath*:/mapper/**/*.xml
自定义失败处理
在认证失败或者授权失败的情况下返回相同结构的json,让前端对响应进行统一的处理
SpringSecurity的异常处理机制
在SpringSecurity中,如果在认证或者授权的过程中出现了异常会被ExceptionTranslationFilter捕获到,在ExceptionTranslationFilter中会判断是认证失败还是授权失败出现的异常
如果是认证过程中出现的异常会被封装成AuthenticationException然后调用AuthenticationEntryPoint对象的方法去进行异常处理
如果是授权过程中出现的异常会被封装成AccessDeniedException然后调用AccessDeniedHandler对象的方法去进行异常处理
如果需要自定义异常处理,需要自定义AuthenticationEntryPoint和AccessDeniedHandler然后配置给SpringSecurity即可
@Component
public class AuthenticationEntryPointImpl implements AuthenticationEntryPoint{
    @Override
    public void commence(HttpServletRequest request,HttpServletResponse response,AuthenticationException authException) throws Exception{
        ResponseResult result = new ResponseResult(HttpStatus.UNAUTHORIZED.value,"用户认证失败,请重新登录!");
        String json = JSON.toJSONString(result);
        //处理异常
        WebUtils.renderString(response,json);
    }
}
@Component
public class AccessDeniedHandlerImpl implements AccessDeniedHandler{
    @Override
    public void handle(HttpServletRequest request,HttpServletResponse response,AuthenticationException authException) throws Exception{
        ResponseResult result = new ResponseResult(HttpStatus.FORBIDDEN.value,"您的权限不足!");
        String json = JSON.toJSONString(result);
        //处理异常
        WebUtils.renderString(response,json);
    }
}
在SecurityConfig类中配置
@Autowired
private AuthenticationEntryPoint authenticationEntryPoint;

@Autowired
private AccessDeniedHandler accessDeniedHandler;

//在configure中配置异常处理器
http.exceptionHandling().authenticationEntryPoint(authenticationEntryPoint).accessDeniedHandler(accessDeniedHandler);
跨域问题解决
浏览器处于安全的考虑,使用XMLHttpRequest对象发起http请求必须遵守同源策略,否则就是跨域的http请求,默认情况下是被禁止的。同源策略要求源相同才能正常进行通信,即协议,域名,端口都完全一致。
前后端分离项目,前端项目和后端项目一般都不是同源的,所以会存在跨域请求的问题。
1、先对SpringBoot配置,运行跨域请求
@Configuration
public class corsConfig implements WebMvcConfigurer{

    @Override
    public void addCorsMappings(CorsRegistry registry){
        //设置允许跨域的路径
        registry.addMapping("/**")
                //设置允许跨域请求的域名
                .allowedOriginPatterns("*")
                //是否允许cookie
                .allowCredentials(true)
                //设置允许的请求方式
                .allowMethods("GET","POST","DELETE","PUT")
                //设置允许的header属性
                .allowedHeaders("*")
                //跨域允许时间
                .maxAge(3600);
    }
}
2、开启SpringSecurity的跨域访问
在SecurityConfig中的configure方法
//允许跨域
http.cors();
权限校验
权限校验方法
hasAuthority
hasAuthority方法实际是调用authentication的getAuthorities方法获取用户的权限列表,然后判断存入的方法参数数据是否在权限列表中
hasAnyAuthority
hasAnyAuthority可以传入多个权限,只要用户有其中任意一个权限都能访问对应资源
@PreAuthorize("hasAnyAuthority('admin','test','system:dept:list')")
public String hello(){
    return "hello";
}
hasRole
hasRole要求有对应的角色才可以访问,但是内部会把我们传入的参数拼接上ROLE_后再去比较,所以用户对应的权限也要有ROLE__这个前缀才可以
hasAnyRole
hasAnyRole要求有任意的角色才可以访问
自定义权限校验方法
@Component("ex")
public class SGExceptionRoot{

    public boolean hasAuthority(String authority){
        //获取当前用户的权限(在filter过滤器中用户信息和权限存入SecurityContextHolder里面)
        Authentication authentication = SecurityContextHolder.getContext().getAuthentication();
        LoginUser loginUser = (LoginUser) authentication.getPrincipal();
        List<String> permissions = loginUser.getPermission();
        //判断用户权限集合是否存在authority
        return permissions.contains(authority);
    }
}
hasAuthority这个方法名和之前的重名,可以使用@指定特定类,使用@ex相当于获取容器中bean的名字为ex的对象
@PreAuthorize(@ex.hasAuthority('admin')")
public String hello(){
    return "hello";
}
基于配置的权限校验
在SecurityConfig配置类中,对接口方法进行权限配置
http.antMatchers("/testCors").hasAuthurity("system:dept:list")
CSRF
CSRF是指跨站请求伪造(Cross-site request forgery),是web常见的攻击之一
SpringSecurity防止CSRF攻击的方式就是通过csrf_token,前端发起请求的时候需要携带这个csrf_token,后端会有过滤器进行校验,如果没有携带或者伪造的就不允许进行访问
CSRF攻击依靠的是cookie所携带的认证信息,但是在前后端分离的项目中项目认证信息是token,token并不是存入cookie中,而是在local storage中,并且需要前端代码去把token设置到请求头中,所以CSRF攻击就不用担心
认证成功处理器
实际上在UsernamePasswordAuthenticationFilter进行登录认证时,如果登录成功会调用AuthenticationSuccessHandler的方法进行认证成功后的处理的。AuthenticationSuccessHandler就是登录成功处理器
SGSuccessHandler
@Component
public class SGSuccessHandler implements AuthenticationSuccessHandler{

    @Override
    public void onAuthenticationSuccess(HttpServletRequest request,HttpServletResponse response,Authentication authentication){
        System.out.println("认证成功了");
    }
}
SecurityConfig
@Configuration
public class SecurityConfig extends WebSecurityConfigurerAdapter{

    @Autowired
    private AuthenticationSuccessHandler successHandler;

    @Override
    protected void configure(HtppSecurity http) throws Exception{
        //登录成功后执行登录成功处理器
        http.formLogin().successHandler(successHandler);

        //Security配置
        //对所有请求授权
        http.authorizeRequests().anyRequest().authenticated();
    }
}
认证失败处理器
实际上在UsernamePasswordAuthenticationFilter进行登录认证时,如果认证失败了会调用AuthenticationFailureHandler的方法进行认证失败后的处理的。AuthenticationFailureHandler就是登录失败处理器
注销成功处理器
实现LogoutSuccessHandler的onLogoutSuccess方法,然后在SecurityConfig配置类中配置注销成功处理器
http.logout().logoutSuccessHandler(logoutSuccessHandler)